CRS Language Extension – Boost Your Productivity with AL/BC
This is the third post of the blog post series “Boost Your Productivity with AL and Business Central”. If you want to know more about what this series is about and why I created it, you can checkout this post.
The CRS Language Extension offers a few features that can make your life a lot easier when developing in AL. In this post, I will talk about the features that I use the most:
- Rename Files
- Snippets for various situations
CRS Language Extension has a lot of functionality but today we will focus on the most important ones. If you want to know more about the other features, feel free to check out the description of the extension.
Probably the most frequently used functionality is “Renaming File”. This functionality alone makes the installation worthwhile. For this reason, it is best to talk about it first.
CRS Language Extension – Renaming/Reorganizing Files
If you’ve named your files yourself so far, I’ve got some good news for you right now – it’s not necessary. From now on you can let the CRS Language Extension do that for you.
The extension renames the file names according to Microsoft guidelines. Currently, the naming follows the following structure, which may change in the future:
<ObjectNameExcludingPrefix>.<FullTypeName>.al
For extensions this naming is currently used:
<ObjectNameExcludingPrefix>.<FullTypeName>Ext.al
The latest Best Practices for AL can be found here.
If you have used the CRS Language Extension in the past, I strongly recommend that you read this blog post by Waldo. Due to new naming conventions from Microsoft, there will be stricter rules for naming in the future. Therefore, your previous file names may have to be renamed. There are a few things to consider that Waldo explains in more detail in his post.
Available CRS Language Extension Functions
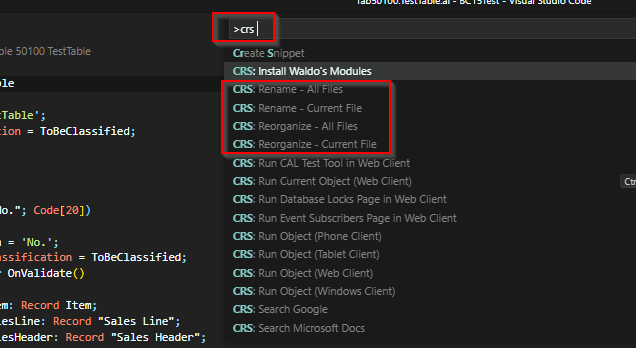
Let’s take a closer look at the functions of the extension. If we open Visual Studio code and execute the keyboard shortcut Ctrl + Shift + P (“Show All Commands”), we can see the list of available CRS functions. For this we type “CRS”.

The following four commands jump out at us:
- Rename – All Files
- Rename – Current File
- Reorganize – All Files
- Reorganize – Current File
Renaming
Okay. Let’s start with the second function “Rename – Current File”. Why the second one? Because the first function “Rename – All Files” does exactly the same as the second one – just for all files instead of just the currently opened one.
I have created a new project. In this project there is an AL file “examplefile.al” for table 50100.

We use the keyboard shortcut Ctrl + Shift + P to open the command window and execute the function “Rename – Current File”.

This will automatically rename my file to “MyTable.Table.al”.

Note: If you have changed the value of the field “CRS.FileNamePattern” in the settings.json file, the extension will rename your file according to the specified pattern. You can also read about the best settings in the settings.json file in Waldo’s blog post.
Update 25.04.2020: Also make sure to read this post by waldo which includes an update on the best settings in the settings.json file.
Reorganize
Afterwards I rename the file once again to “examplefile.al”. This time we use the function “Reorganize – Current File”.

This renames the file and moves it to the “src\table” folder.

The function “CRS – Reorganize All Files” would do the same for all files.
AL Snippets
The CRS AL Language Extension comes with many snippets. You can get a good overview of the snippets by opening an AL file and typing “twaldo” in the editor. It is best to test the different snippets yourself.

Some of the snippets can save you a lot of time. Especially if you are still used to programming with C/AL, you probably type most of the keywords completely by yourself. There are some snippets like “twhile”, “twithdo” etc. which can save you a lot of work.
With the help of these snippets the structure is already given to you and you can jump through the different snippets with the Tab key. On the following screenshot I use the snippet “twhile(waldo)”.
The snippet directly creates a complete while block for me. Very useful for programming!


Another snippet has caught my eye in the last few days – “tProcedureFromClipboard”. It takes the text from your clipboard and creates a function for it. Excellent!
For this we take the following sample code:

Then we copy the two lines of code between begin and end.
We jump to an empty place within our AL file and call the snippet “tProcedureFromClipboard”

This is the result:

That’s it! Hope you got something here for yourself. See you next time.
3 thoughts on “CRS Language Extension – Boost Your Productivity with AL/BC”
Great content! Super high-quality! Keep it up! 🙂
Well, how do I…where is the… alright, I will checkout a tutorial first. This was my reaction when someone asked me to add fields to a Word Report and I opened a Microsoft Word layout for the first time.
What You Will Learn
In this post you will learn how to add a field to an already existing standard report invoice in Visual Studio Code. My examples are done in a docker container with Business Central 15.
Update 13.11.2020: The approach taken in this tutorial is still valid and can also be used for RDLC reports, except of step 5.
I assume that you already have set up an environment with business central. You will also need the extensions AZ AL Dev Tools/AL Code Outline by Andrzej Zwierzchowski and ALRunner by Tobias Fenster. Having installed Waldo’s CRS AL Language Extension is optional but also recommended.
What We Will Do
Basically we need to take these steps to accomplish our goal:
Create a new A/L Project with our running sandbox
Copy standard report to a new number and name
Add a new column to the dataset
Include layout in the project
Add the new field in the layout
Publish report
Enjoy
1. Create a new A/L Project with our running sandbox
First, we need to create a new A/L Project in Visual Studio Code. If you have not setup a running sandbox container yet, you can checkout this post. For the next steps, I will assume that you have a running container and already downloaded the symbols.
It is also a good idea to set “launchBrowser” in your “launch.json” to “false”.
2. Copy Standard Report To a New Number and Name
We use the AZ AL Dev Tools to open the base application in the AL Object Browser. Rightclick on the Base Application and select “Open in AL Object Browser”.
Update 13.11.2020: You do not have to use the right click anymore. Just left click on the Base Application once.
This window will show up:
Select the object type “Reports” and search for ID “1306”.
Right click the result. Select “Go to definition”.
Use Ctrl + A to select the whole file text. Copy it.
Right click in the empty space below your last file. Select “New File”.
I will call my file “StandardSalesInvoiceCopy.al”.
Open the created file. Paste the copied text from the standard report into the blank file. If you now hover over the first line, you will see this error:
“An application object of type ‘Report’ with name ‘Standard Sales – Invoice’ is already declared”.
That is because we are using the same name and ID as the standard report. So let’s change the ID to 50100 and the name to “Standard Sales – Invoice Copy”.
This step is optional. We are all good people. So let’s stick to the file naming conventions. Waldo’s CRS AL Language Extension has a wonderful renaming feature. Press Ctrl + Shift + P. Search for CRS: Rename – Current File. Rename the file and checkout the result:
Update 25.04.2020: We could also have used the Reorganizing functionality of the CRS Language Extension. This would have created a separate folder for our report file. If you want to find out more about the CRS Language Extension and its useful features, you can read more here.
3. Add New Column To the Dataset
Uh yes. The fun part starts here. Our next step is to include our new field in the dataset. We want to see the field “VAT Bus. Posting Group” in our invoice. Not the regular customer requirement, but let’s go with it for demonstration purposes.
Navigate to the last dataset column of the header and place your new field below it. You can use the “Add multiple fields” feature from the dev tools in order to add “the VAT Bus. Posting Group” to the dataset.
Why add the column after the last one? We place it below the last one because it is easier to see later that this field is a customization. If you always place your new code “somewhere” in the middle of already existing code and other people do it as well, you get some good old coleslaw. Coleslaw not good for developers. It should be easy to see what is the standard code and what is customization code.
Long talk, no walk. Here is where we are now:
4. Include Layout in The Project
So far we have only been working with the .al file of our report. But our report does not only consist of an “.al” file. It also needs a “.docx” file if we want to “see something”. So let’s go get the layout.
Open your sandbox in the web client. Search for “Custom Report Layouts”. You can use the reading glass or ALT + Q to search:
Search for Report ID 1306.
Select the first report. Click on “Layout” -> “Export Layout” to export the Word layout.
Update 25.04.2020: If you cannot find your report in the Custom Report Layouts, you can create a new record by clicking “New” and filling out the necessary fields. It is also possible to export RDL layouts – just in case you were confused that you can only see Word layouts in this screenshot.
Navigate to the folder of the downloaded file.
Drag and drop the file from the Windows Explorer to your Visual Studio Code Project:
Yes. We are getting forward. This is where we are now:
Right click on your al file. Choose “Rename”. Copy the file name except the file ending (.al).
Use the copied file name to rename the downloaded layout:
There is one last thing we have to do. Right now, our new “.al” file is not linked to our new “.docx” layout. So let’s fix it. Change the WordLayout in our “.al” file from this:
… to this:
Use Ctrl + Shift + B to run the build task. If you do not do this, then our new field in the dataset will not be accessible in our layout:
5. Add New Field in the Layout
Do you smell the finish already? We are almost there. Our field is included in the dataset. Microsoft Word is already waiting for us. If you have never made changes to a word layout yet, be ready for a little surprise.
Right click on the “.docx” file and select “Open Externally”.
Microsoft Word launches. Activate the showing of paragraphs. This will make it easier to find spots where we can insert text:
Check if you can see the Developer Tab.
If not, you are doomed. No, just kidding. You can make it visible by following the steps in this tutorial.
Navigate to your “Developer” tab and open the XML Mapping Pane.
Find the report XML part.
Search for our “VAT Bus Posting Group” field below the “Header” DataItem :
Click in the space where we want to add our new field. We want it below the Work description:
Right click on our VATBusPostingGroup. Select “Insert Content Control” -> “Plain Text”.
Result:
Save and close the file.
6. Publish Report
Now start your project without debugging (Ctrl + F5) to publish the report:
If you have specified in your launch file to launch the browser, ignore the now opened browser.
Go to the first line of your report .al file. Run the selection with “Alt + R”. This will run the report in your sandbox:
Filter for a “Posted Sales Invoice” No. and click “Preview”:
7. Enjoy!
This is our result. Our field “VAT Bus. Posting Group” is being printed:
Congratulations. Have a nice week 🙂
Mentions